Pages

Saturday, February 25, 2012

Cub Scout "Cake"

Here is the "cake" I made for the Cub Scout Blue and Gold Banquet tonight. 

I have been wanting an excuse to make one of these cakes forever!!  I originally wanted the bottom and top layers to be blue and the middle layer to be gold, but I ran out of those exact shades of cardstock, and therefore had to improvise with white.  I was not about to run back out to the store to buy more paper that will just be torn apart anyway. (I know... I'm cheap like that.) haha

Do you love the added touch of my son's pinewood derby car on top?? It just happened to be blue - I liked it. :)

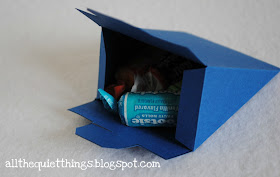
The little slices are boxes that hold candy or toys.


I printed out the Cub Scout logo onto white cardstock, cut off the blue trim, and used more of the blue cardstock for the back. (That way the wooden skewer is sort of sandwiched in between the papers.)  Then, I just added ribbons - I didn't want it to be too girly, but I needed to hold the cake pieces a little tighter together.

Now, I just hope it will make it to the banquet - we have crazy winds here in Idaho today!!!

I have the templates you can download for the cake slices.  There are super cute paper cakes all over the internet.  (Like I said - I have been wanting to make this for a long time.)


Have Fun!!

Photobucket

Monday, February 20, 2012

Easter Goodie Boxes

Okay, so here are some Easter goodie boxes that you could use really for any occasion.  They are super easy to make, too!

Here is the carrot.  These ribbons are actually a gorgeous green color. :)  I stamped white flowers and butterflies on the cardstock, but it would be really cute to use some orange patterned paper too, like polka dots - I love polka dots! The little tag says "happy spring".  Again, you could do whatever you wanted.

Download Carrot PDF

Here is the little basket.  I seriously whipped this one up like 5 minutes before I took the picture.  I cut out the template and then placed it over my cardstock, cut that out, scored it, folded it, and punched a cute little flower brad through it to hold it together.  Then, for the paper (you could use Easter grass) I picked a matching color, sent it through a paper crimper, and then through my office shredder.  How easy is that? 

I didn't have any Easter candy on hand (I might have to remedy that very soon), but wouldn't Cadbury Eggs be the best in that basket??  Yummy! My favorite! :D


Well, hope you like these!  Thanks for stopping by!
Photobucket

Wednesday, February 15, 2012

She Sells Sea Shells...

I have always loved beach-themed bedrooms and bathrooms - they are so calm and relaxing.   
My husband's sister has a beach house in Mexico, right on the Sea of Cortez, and we were lucky enough to be able to spend Thanksgiving there.  It was so beautiful and so much fun!

We came home with sunburns and waaay too many shells! Haha :)  I had to come up with some clever ways to display them, or they would just end up sitting in a box somewhere.

I am in the process of redoing my guest bathroom and wanted some beachy items in there.  However, there is not much room for shelves or anything. (It's basically a closet with a toilet.)  So I made this shell wreath:

I LOVE it because a) it was super easy and b) it shows tons of shells all in one place without taking up much room.

All I did was get one of those styrofoam wreaths that is basically cut in half, so one side lays flat against the wall.  Then, I just hot-glued the shells all over it randomly starting with the big flat ones first, and then tucking in the small ones to fill in any spaces.  The starfish was one we bought somewhere and I think it just added that extra something it needed.

My next favorite thing is my basket of sand dollars - Love them!!

I think I like them more because we had to work so hard to get them, and then bring them all home and wash them in bleach water. (They still kind of stink by the way.)

Actually they were all over the beach just waiting to be picked up, but you had to go to a special area, at a certain time of night, only after a big storm, wearing a trench coat and dark glasses.  Okay, I threw that last part in, but apparently it's quite the elaborate scheme to get these babies.  I only wish I'd had more people with me, since I ended up carrying most of them in my sweatshirt.

All the other shells we collected were readily available everywhere you stepped.  I wanted to fill a jar with those little tiny spiral shells, so I would gather like crazy, but then got really bored with it, so I only mostly filled my jar.  I know - I'm a slacker...*sigh*
I filled the rest with the pretty white spirals.  By the way, there are a LOT more than it looks!  Those things were tiny!
I also have this fish bowl looking thing that I got and filled with sand.  I had this on a shelf above the toilet, but I don't think I'll put it back up after we paint. 

Any other great or amazing shells that caught my eye went in this jar.  I got this jar at Tai Pan Trading, along with the iron basket that my sand dollars are in.  I love them because they look so perfect with the shells.  I might end up putting my sand and candle in this jar instead of the fish bowl thing.  I don't know. 

Right now, the sand dollars are in the center of my table, and the two jars filled with shells are on my hutch.  The wreath will go in my bathroom, along with some black and white beach prints on canvas that I'm working on right now. 
Here is the wreath hanging in my bathroom - the lighting is horrible, sorry.


I love the beach! Why do I live in Idaho again?  Ugh.  Oh well - someday.  Haha :)


Photobucket

Friday, February 10, 2012

Primary Spotlights

This year in our primary (which is part of our church) we are spotlighting each of the kids so we can get to know them better.

We had either them or their parents fill them out, and then each week we read them and have everyone guess who it is.  

Instead of more candy, we decided to just give them a big sticker to show that they were spotlighted.  Afterwards, we post their spotlight form on the bulletin board for everyone to see.

I just got a package of Avery Shipping Labels at Walmart - they are 2" x 4", and there are 10 labels to a sheet.  This page should fit that exactly.  (It better - it took me HOURS to get it right!!)  

My little sister is doing spotlights in her primary also, and they are using a cute little CTR mailbox to pull the spotlight out of.
Sooo cute, huh?  It totally matches the CTR birthday cards! 
I think I would be all "Here's the mail, it never fails, it makes me want to wag my tail..." (I know you all are singing that in your heads right now, admit it.)


Towards the end of last year, we did a spotlight for our teachers to show how much we appreciated them.
This is what we gave them.  We made sure to tell them they didn't have to share with their class! Haha :)

We also made a form for them to fill out, and put it on the bulletin board also.


You can download the scripture and spotight forms also.


Well, hopefully someone can get some use out of these besides just me. :)

Thanks for stopping by!


Photobucket

Wednesday, February 8, 2012

Valentine Pillows: The Sequel

Okay, I promised to show more details about these pillows that my very talented sis-in-law Kris made.

First of all, they are made out of the most gorgeous fabric - I wish you could see them in person! 

She cut out circles of fabric and tulle, folded them into fourths, and then just stitched across the corner of each - just enough to give the center a pinched look.

She opened up the circles, and pinned them onto her pillow fabric in the shape of a heart.  Then, she just ran the sewing machine all over the heart randomly, kind of making large S shapes, making sure she ran over every circle.  Make sense?


 You can see in the pictures that some of the edges stick up, making it look super textured.

I LOVE this technique! And the tulle just adds to it so much

Well, there they are - aren't they gorgeous?  She is an excellent seamstress, so all her stuff looks totally professional.  I'm jealous!  Thank you sooo much Kris!

Photobucket

Thursday, February 2, 2012

Now I Know My ABC's...

I saw these cute alphabet printables on Pinterest recently, and decided I had to make them for my little girl. 

I just printed them out onto white cardstock, cut them out, and laminated them. (Using my new laminator I got for Christmas! Yay!)

Then, I punched a small hole in the corner, threaded a keychain ring through, and added some cute scraps of ribbon.  How easy is that?

from Kaden's Corner
You can dowload the free printables here.


Thanks for stopping by! :)

Photobucket