Pages

Monday, November 19, 2012

Fall/Thanksgiving Decorating Ideas

I was about to take down all my fall decorations, and decided I would take some pictures of a few things I did this year.
I really like decorating for fall because everything looks so earthy, and the colors are perfect in my house! Yay!
Last year I bought a TON of artificial fall flowers at Michael's on clearance, so I needed to figure out what to do with them this year. Haha :)
These two are exactly the same, but I put them in different rooms, so it turned out okay. I just filled a glass container with mixed nuts, and stuck a bunch of flowers in. I think next year I'll put one of these in a metal bucket instead.
 
 
This is a sign I made last year. I got the inspiration for the lettering HERE. I had an old scrap of wood that I painted & then Mod Podged some cute scrapbook paper onto it. Then, I added the vinyl (white contact paper) and the twine. The acorn is actually white contact paper that I sponge-painted the color I wanted - it totally worked!!
(I used the same lettering but added it to a plate for my sister-in-law's birthday.)
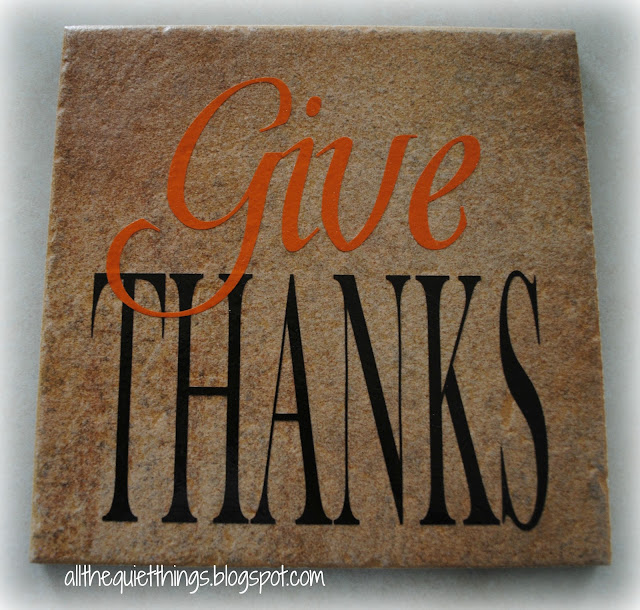
I think I actually bought the vinyl for this - then just applied it to a ceramic tile.
 
Well, these are just a few ideas of things I've made for fall. Most of my fall decorations were purchased. Maybe I can find some cute ideas for next year? :)
Photobucket

Sunday, November 11, 2012

No More Black Smoke!

 
I LOVE the smell of candles!  Especially during the fall/winter.  What I don't like is the yucky black smoke, not to mention having an open flame in my house.
 
After refusing to light even one more candle, I got a little warmer like this....
It was okay, but there are some things I didn't like about it.

1)  It's hard to tell if it's on. (I left it on all night once - yikes!)
2)  They don't even start to smell until the wax melts all the way through the top.  So, if you have a large candle - that could take all day!
3)  You still have to buy a jar candle - and sorry, but they can be expensive.
4)  Not very cute. :)
 
Therefore, I have totally converted over to the adorable warmer pots. 
 
They start smelling immediately,  the pots are super cute, and the wax is really inexpensive (because you can use any kind).  That's my favorite part.  The warmer I got was from Bed Bath & Beyond.  It came with a free wax and I had a coupon - yay!
Then, when I was in Walmart, they had some yummy smelling wax from Better Homes & Gardens that were only $2 a piece.  Can't beat that. :)  I melted a carrot cake one yesterday - yummo!!
 
Now, what to do with all my old favorite-smelling candles?  I can't ever light them again because the wick is melted somewhere inside, and the old warmer takes too long - so I turned them into bricks! 
 
Here is what I did:
1) Melt the old candle wax completely. I used the old warmer, you can also use hot water on the stove.
 
2)  Pour melted wax into molds.  I used the one that came with my warmer and the other one I bought at Walmart.  I wonder if those little silicone trays would work?  I might have to try it. :)
 
3)  Let cool completely.  Since I only had two molds, I stuck mine in the fridge just to get them cooled faster.
 
That's it!  After they were all done, I put them in plastic bags labeled with the name of the scent, and stuck them in a drawer.  That's another good thing - they take up sooo much less space than all those candles did! 
 
If you wrapped them up pretty - they would make really great gifts, too!
Love it!! Now I'm off to help my mom make blocks out of all her old candles! haha :)
 
Photobucket

Tuesday, November 6, 2012

Castle for Boys

A few years ago, my dad was making a doll house for my sister to give to her daughter for Christmas. I only had boys at the time - not fair, huh? So, I decided I would loooove for him to make a play fort/castle for my son.

Wow! Can I just tell you how AMAZING my dad is??? Check this out...
I wish I had this blog back then, because I would have taken pics along the way, and given you guys the "plans".  (My dad totally made this up as he went.  He's good like that.)
 
He made the entire thing out of scrap wood that he had lying around.  You can see that the walls are made of beadboard - I kind of liked that, it adds texture.  The four corners are made from the tubes that carpet is rolled on.  I guess you can buy those - and they work really well, because they are super thick and sturdy.
 
I did all of the painting, and the added decals are just pictures I stuck on with Mod Podge.  I will try to show you as many of the details as I can.
 
This is the whole thing put together.  One of my main specifications when "we" (haha) were designing this was it needed to be able to come apart, so we could store it. Because lets face it, the thing is HUGE!
 
Here it is all taken apart.  It stacks together nicely and doesn't take up too much room.
 
Here is how the walls fit together.  My dad made 3 notches and the two side walls can fit on either side.  I had him cut a hole in the top and bottom, so the people could have a chute or a dungeon-type thing.  (Have you ever played with the original Fisher-Price Castle?)
 
You can see how scruffy this thing has gotten from being taken apart and played with so many times.  Well, at least it's been well loved, right?
 
This is the back door - I love the little beam-latch-thingy! (Okay, I have no idea what it's called.) 


This is one of my favorite parts - the front gate/drawbridge. My dad rigged up a little pulley system that can raise and lower the gate.  The gate is made out of orangewood sticks.  Very clever, yes?
 
There is also another string that keeps the drawbridge closed.  He attatched them to little screws on the sides.
 
Here is the front with the drawbridge down.
 
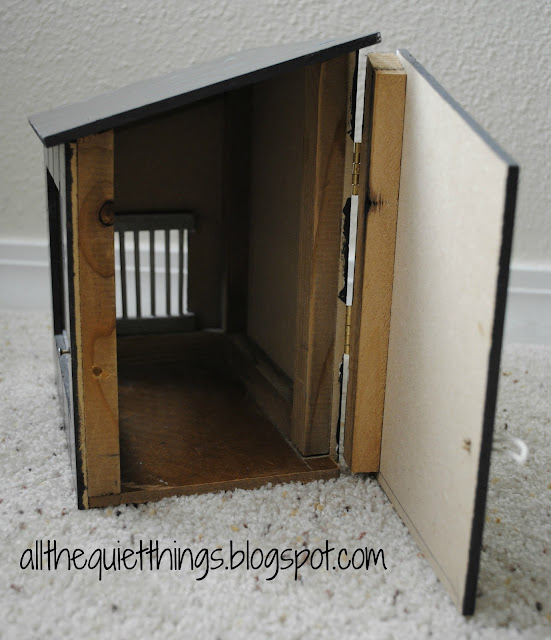
This is my other favorite part - my dad made a little prison! One of it's main purposes is to hold all the castle pieces when my son is done playing with them - genius!
 
 
It has a little latch to keep it closed.  The prison bars are also made from orangewood sticks.
 
A little window on the side.  (I think my dad had as much fun making this as my son had playing with it.)
 
I went online and found some crests, torches and windows that I liked, printed them out and just stuck them on with Mod Podge.  I really liked the windows in the towers because they look almost 3D.  I also covered the entire thing in Mod Podge because I liked the subtle texture it gave.
 
I did both of the sides like this.  Really simple - I didn't want too much going on.
 
 
Don't you love my little knights?  I think they're so cute! They are guarding the back door. :)
 
My dad had some old wood that he covered the doors with, and I loved the rustic look of them, so I left them natural.
 
 
Here is a close up of one of the turrets. My dad just glued something inside to hold the circle of wood so the people would have a look-out. He drilled a tiny hole in the middle for me and I glued in a coffee stir straw for the flagpole.  (I needed it to be flexible so it would not impale my son while he was playing - yikes!)   I made the flag out of felt and glued that on, too.
 
 
You can use little castle play pieces, or....
 
Regular army guys work, too.  My son has used anything and everything. :)
 
Here is a picture from Christmas 2009 when it was brand-new.  My dad also made that little ladder, but I can't seem to find it now. (Look how nice and shiny the paint was back then!) haha
 
Here is my 2-yr-old daughter playing in it.  This shows you just how big it is.  We had to take one wall off because she's too short to step over.
 
Notice how the Ninja Turtles are "taking a nap"? Girls can totally play with this too!! haha
 
I really really love this castle! Mostly because my dad made it, and it will be passed down in the future - but I had so much fun painting and "decorating" it.  I kept it hidden and right after my son left for school each morning, I would run get it out and work on it all day.  It was so rewarding to see his face Christmas morning!
 
 
Thank you for stopping by!  Hopefully I can inspire someone to make their own fort/castle - it was so much fun!
Photobucket

Tuesday, October 30, 2012

Stay-Soft Brown Sugar

Everyone has "tricks" to keep their brown sugar soft. I have heard them all, and even tried them all. (Anyone ever put a piece of bread in your brown sugar container?) And guess what? They NEVER work! Sorry, but they don't.
 
A million years ago (maybe like 10) when we got our vacuum sealer, I started putting my brown sugar in jars and then sucking the air out - it worked great!  Then, I got lazy and stopped using the sealer.  It STILL worked great!!  I have been putting my brown sugar in jars ever since, and never ever ever had one speck of hardened brown sugar.  Seriously.  It's that easy.  Who knew?


When I open a new bag of brown sugar, I just pour as much as I can into a wide-mouth jar* and then poke it down with the tip of a spoon. I don't pack it tight, but kind of jab at it, so it fits better and gets any lumps out.  I keep doing that until it's almost to the very top.  Then I just store them in my pantry to use as needed.
 
 *I use wide-mouth so it's easier to spoon out.  And I also like the smaller jars, but you really can use any kind you want.


So that's it!  I recently converted my sister to this jar method and she loves it!  Try it and see what you think.  
 
Photobucket

Tuesday, September 25, 2012

2 Week "Power Cooking"

I have done what I call "Power Cooking" for years, but it was always for myself. (Chicken breasts, sweet potatoes, etc. so I could have healthy food to eat during the week.)
 
I never thought of doing it for my family! Ha! Well, people have inspired me - and I thought I would finally give it a go. :)  I have teenage boys in sports/school activities, a husband who works late, a 9 year-old and a 2 year-old who can't wait that long for dinner.  It was really hard to make dinner when everyone eats at different times!
 
So after reading lots of blogs and checking out books from the library - I decided to start small and just try the 2 week meal idea first. 
 
My family is not big on repeats, unless I have a few weeks in between, so I actually printed out a blank calendar and made a 6 week menu.  I made 11 meals for the freezer (we'll have baked potatoes, hoagies, etc. on the other nights, so I didn't need to freeze anything for that.)  So some of the meals that I had doubled, will actually be used later in the month.
 
Note: These are not complete meals that you just take out of the freezer and cook.
I decided I wanted to use my family's favorite meals, that I would be making normally, but just figure out a way to make them easier and have most of the cooking done ahead of time.
 
These look really gross, sorry - I took the picture after everything was frozen. I was worried that they would sit out too long otherwise.
 
Next time I do my power cooking, I think I will do a whole month (yikes!) and see how that works. :o
 
Here is my menu:
Pork Tenderloin (2 meals)
Old-Fashioned Chicken Noodle Soup - I froze just after you shred the chicken, before you add noodles and milk.
Beef Enchiladas (Just the filling, because the tortillas get really soggy if you make it first and freeze it. Trust me - yuck!)
Chicken Marinade (2 meals worth) - I just froze the chicken right in the marinade, so it will marinate as it thaws and then we just throw it on the grill!
Pasta e' Fagioli Soup - As with the chicken soup, I froze it before adding the pasta.  I will just let both soups simmer and warm up awhile first.
Baked Potatoes with Chili
Lasagna (2 pans) - Assemble and freeze in a disposable pan.  Easy peasy.
Chicken & Wild Rice Soup (I froze the chicken and veggies to assemble in the crock pot.)
Hoagies
Tacos (Meat only) - Brown meat, add seasonings, cool and freeze.
California Wild Rice Salad (I froze the cooked, shredded chicken only, for this recipe.)
Potato and Ham Chowder - Could freeze the chopped onions and ham - I didn't.
Homemade Mac-n-Cheese (my kiddos LOVE it)
1 night to eat out - when I do my next day of Power Cooking!!
 
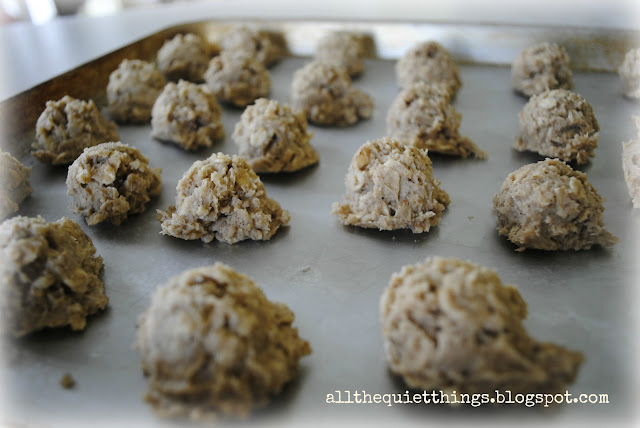
I even went crazy and cooked bacon to freeze and also made cookies! (I freeze the dough in balls, so we can just pop them in the oven anytime.)
 
 
Okay, so I just made the oatmeal cookies today - whatever. haha :) I think I will always freeze extra any time I am in the 'baking mood', especially for the holidays! 
 
So you see that nothing repeats, and I actually have some meals to use for next time!  Yay!
 
I am really excited to do this again - it's kind of fun to have all the hard work over and done with.
 
It only took me about 4 hours, but I will say that my back was killing me and the kitchen was a total mess! haha
Which is why I plan on eating out the night I do my power cooking! :)


Have fun cooking, everyone!!
Photobucket

Tuesday, July 17, 2012

Fun Summer Cards

I have a confession.... I hate scrapbooking! Hate it! I don't know why. I think it might be because it takes for-ev-er just to make one page, and I have mountains of pictures. Ugh!

I do however LOVE to make cards! Once you figure out your card design, you can whip up like four at once.  And they are sooo cute. 

I also love summer!!

So today I thought I would just post some of the fun summer cards that I have made in the past.
My sisters and I get together and have card-making weekends, where all we do is make cards. So fun! :)


For the cones - I just scored some tan cardstock, cut it to look like a cone and sponged a bit of brown ink over it.  Then, I cut a circle with a scalloped punch, and cut off part so it looks like ice cream scoops.  The background is a Cuttlebug embossing folder.  Pretty simple.

These are flip flop cards that I made with some really great Hawaiian paper that I found.  I just made a template shaped like a flip flop and cut them out.  Then, punched holes and used ribbons for the top.

This one is a fun shaker card that kids would love.  You can find lots of tutorials online for shaker cards - they are pretty easy to make.  I filled it with sand and tiny shells.

My little sister really liked this card - me, not so much.  I don't know why - maybe it's just the lettering, I don't know. We ran the tan paper through my cuttlebug, scored it and then flipped it over so it looks kind of like a graham cracker.  Then, we used the scalloped punch for the bite marks.

I really like the colors in this popsicle card - so summery!
WARNING:  I have a bunch of lemonade cards coming up....sorry - I was obviously on a lemonade kick one day! haha :)

This is just a pocket card.  I made some of these for hot cocoa in the winter.  I don't even know if you can still buy lemonade packets like this anymore.  It would be cute to put a bunch of those individual water bottle flavor packets in a pocket card, too.

This is a matchbox card - basically it just folds the opposite way a normal card does, and you use a staple to hold it.  Super simple.

Here is the inside.


This last one is a lip gloss card that I made for my Activity Day girls a couple years ago. (I can't believe I still had one left!) haha
You can't see it very well, but there are tiny clear beads along the rim of the glass.  The colors are fun, too.
The inside holds a lip gloss!  You can also search for lip gloss card tutorials - I'm sure they are all over the place. :) 

Well, that's it for now.  Have a fun summer!! :)
Photobucket
Related Posts Plugin for WordPress, Blogger...