This post took me a year to get around to and when you see all the millions of pictures & measurements, you will know why. Yikes!
We wanted to make a Barbie house for my daughter's 5th birthday. We looked around online and decided to make one out of a bookcase. Well, apparently bookcases are hard to find, or pretty expensive. The one we ended up with was too skinny & the Barbies didn't fit very well. So we scrapped that plan and decided to make one.
I measured the Barbies laying down and standing up, and decided that I wanted lots of rooms so everyone had a place. (Like a giant Barbie compound.) haha
My dad made us 2 matching dollhouses when I was little & I wish I was talented enough to recreate those! They had balconies and stairs that led up to a rooftop patio. My mom made all the furniture and they were NICE - and sturdy!

So I recreated the dollhouse the best I could - minus the stairs. ;) I made all the furniture out of solid wood & scraps. I didn't want any flimsy furniture that would fall apart from rough play.
So..... Here is my version of my childhood dollhouse.

Just so you know - this thing is HUGE!!! At the highest point -it's over 5 feet high!! Obviously, I didn't want her to outgrow it. :\
So, let me go ahead and break down the measurements for you.

We basically built a box that was a little longer on one side. Added floors and room dividers and a little angled roof on top.

We bought 12" planks of wood (but in reality they only measure about 11.25"), then we just cut them to the sizes that we wanted.
Right side - 51.5" high
Left side - 45" high
We had 4 pieces of wood that were 48" long. These make all the horizontal pieces.
Each of the room dividers were 14" high. We had 4 of those and 1 that was 13" high - that was for the roof.
The top angled roof piece is 27".
Horizontally, this is how wide each room is:
Patio - 27" Attic room - 21"
3rd floor - 23.5" (2 rooms)
Middle floor - 14", 18", 14" (3 rooms)
Bottom floor - 23.5" (2 rooms)
We got some wood for the backing and that helped make it more sturdy as well.
Does that cover everything?? I hope so.
Now I will take you on a little tour room by room to show you the furniture and how I decorated it.
P.S. This was SO MUCH FUN to make!!!! I did let my daughter choose the color scheme for one of the rooms. Can you guess which one it was? Hint: Her favorite color is purple. ;)
She wasn't allowed to see me painting and decorating it though, so it was a total surprise at the end.
We'll start with the MASTER BEDROOM.

I think this is one of my favorite rooms. I just love the "wallpaper" - it was actually a roll of contact paper that I found at the dollar store. Score! The carpet is just some furry material I bought & hot glued down. The little plant was either from the dollar store or the craft store. I originally got it thinking I would take the plant out and put it in a little terra cotta pot, but I ended up really liking it the way it was. The little box at the end of the bed is perfect for holding shoes and other accessories. I think this room needs something on the wall though. Maybe a little mirror or something?


Here is how I made the master bed. It's just a piece of wood as the base. 4 dowels for the legs, and a decorative piece of wood (found at the craft store) that was cut at the bottom so it didn't go below the bed. The measurements are all listed above.

I painted everything black, then I cut pieces from a dishtowel I found at Target, and hot glued them to the base for a dust ruffle. The mattress is just a piece of foam (you can find a pack of 1" foam pieces at the craft store where they sell pillows and other cushions) covered by white material. I literally "wrapped" it like a present and hot glued everything nice and tight. I even hot glued the mattress down to the base. (No reason to have extra pieces all over the place, right?)

I just sewed a little comforter and some pillows. (Don't look too close - horrible stitching job!)


This is the little trunk at the foot of the bed. I painted it all black. You could totally add a cute seat cushion on top but I couldn't find a pattern I liked that would match the room.
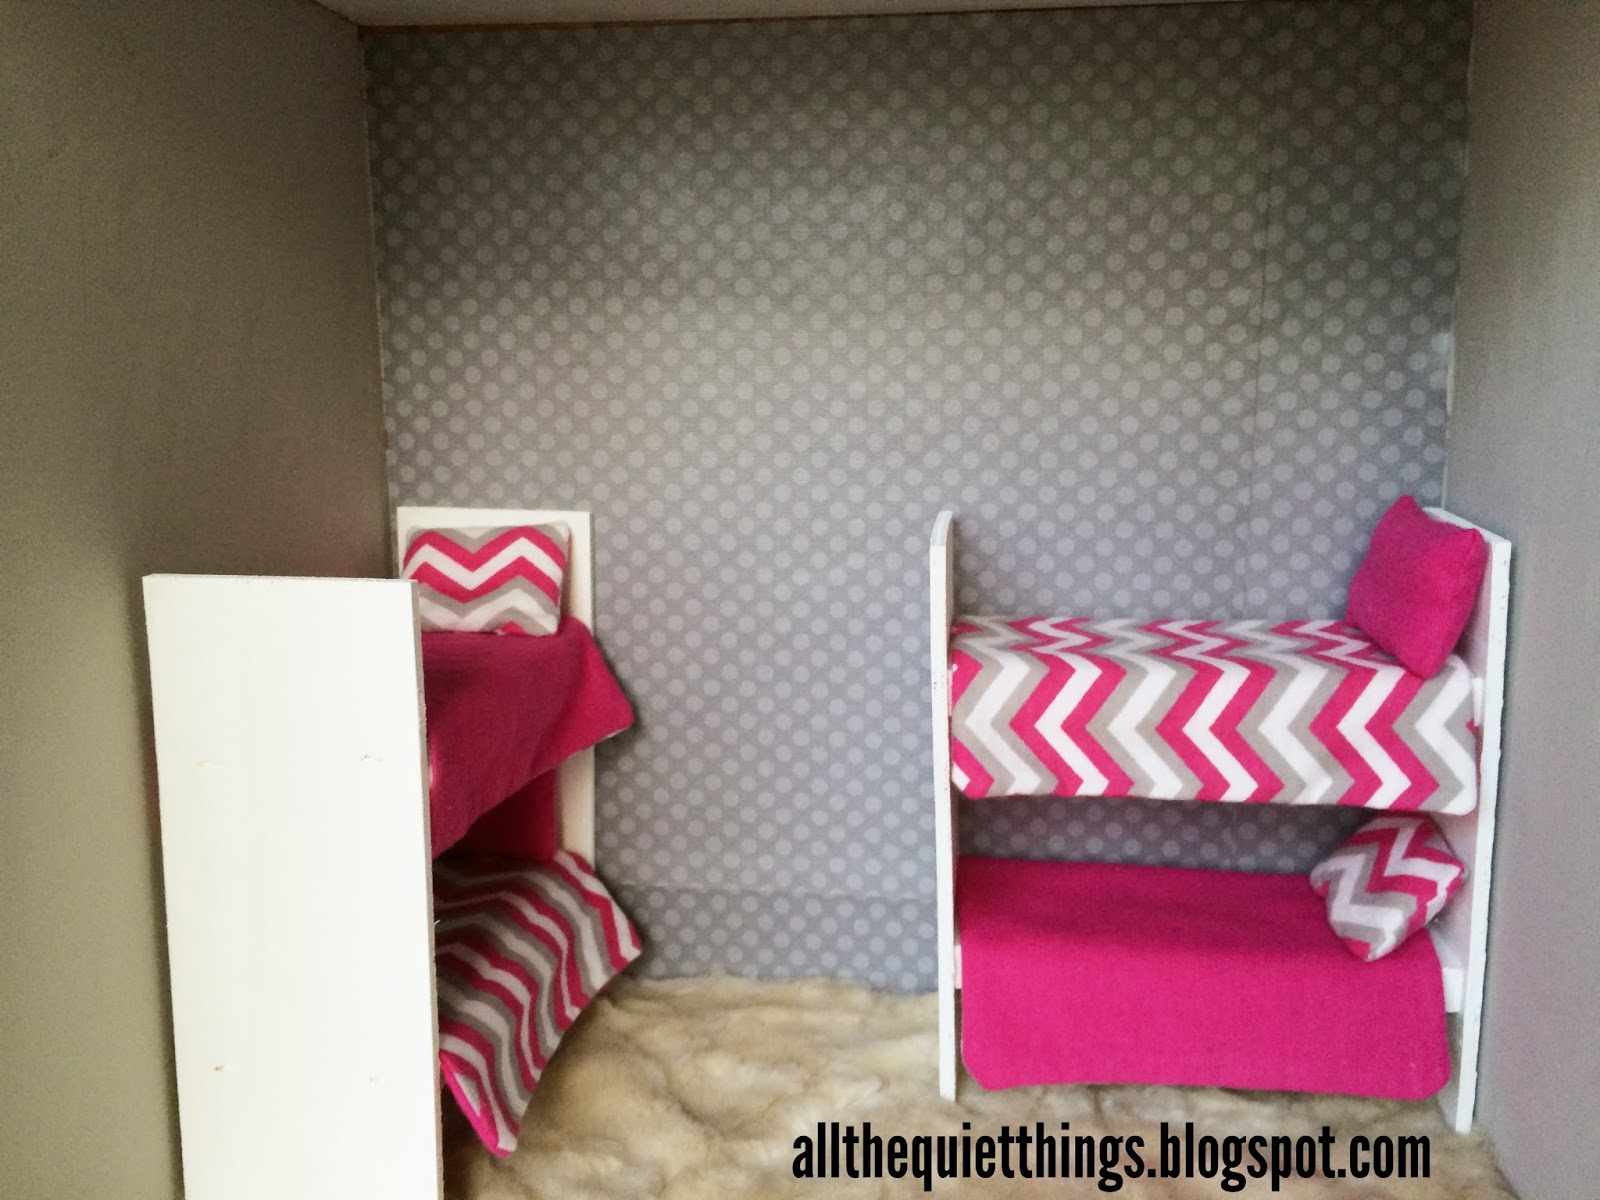
Next comes one of the "Teenager" Rooms.

There was no wood deep enough for the beds to stick out straight, so they all have to go sideways. I think they look super cute though. I also love the little bean bag in the corner. Just right for hanging out with friends.

2 of the walls are painted purple and the wall on the left is floral purple scrapbook paper. I also bunched up some tulle to make kind of a princess canopy.

These are just long blocks of wood with headboards and footboards attached. I actually made 4 of these because I have 2 "teenager rooms".
Here are the measurements:


I painted the beds white, then I folded and glued some cute flannel material around some thin batting, and then glued the entire thing to the bed.

I made a fluffy blanket and matching pillow. These can come off, so she can cover her dolls up for the night and then make the beds in the morning. ;)

This is the bean bag I made. I think I just got a bowl, traced two circles, sewed it most of the way closed and then filled it with rice.
Toddler/Baby Room
You know those cute little Kelly dolls? They fit perfectly in these beds! They are so adorable. The carpeting in this room is way softer than the rest of the rooms, it feels more like real fur rather than fake, if that makes sense. The walls are painted grey with one wall that is polka dot scrapbook paper. You can totally see the lines in the pictures, but in person you can hardly tell. My daughter doesn't notice. ;)


At the craft store they sell packages of these thin wood pieces. They are exactly this size, we didn't even have to cut them. The other wood is just scrap wood. Measurements are above. We stapled it all together and painted the entire thing white.

I didn't make a little soft mattress for these beds, I just used the wood as the mattress. I made little reversible blankets and pillows. Make sure to make the blankets long enough to cover the dolls when they are laying down.

Second Teenage Room


Again, I just made a little mattress out of batting and covered it in material. I also glued the mattress to the bed. Then I made a little blanket and pillow.

Bathroom
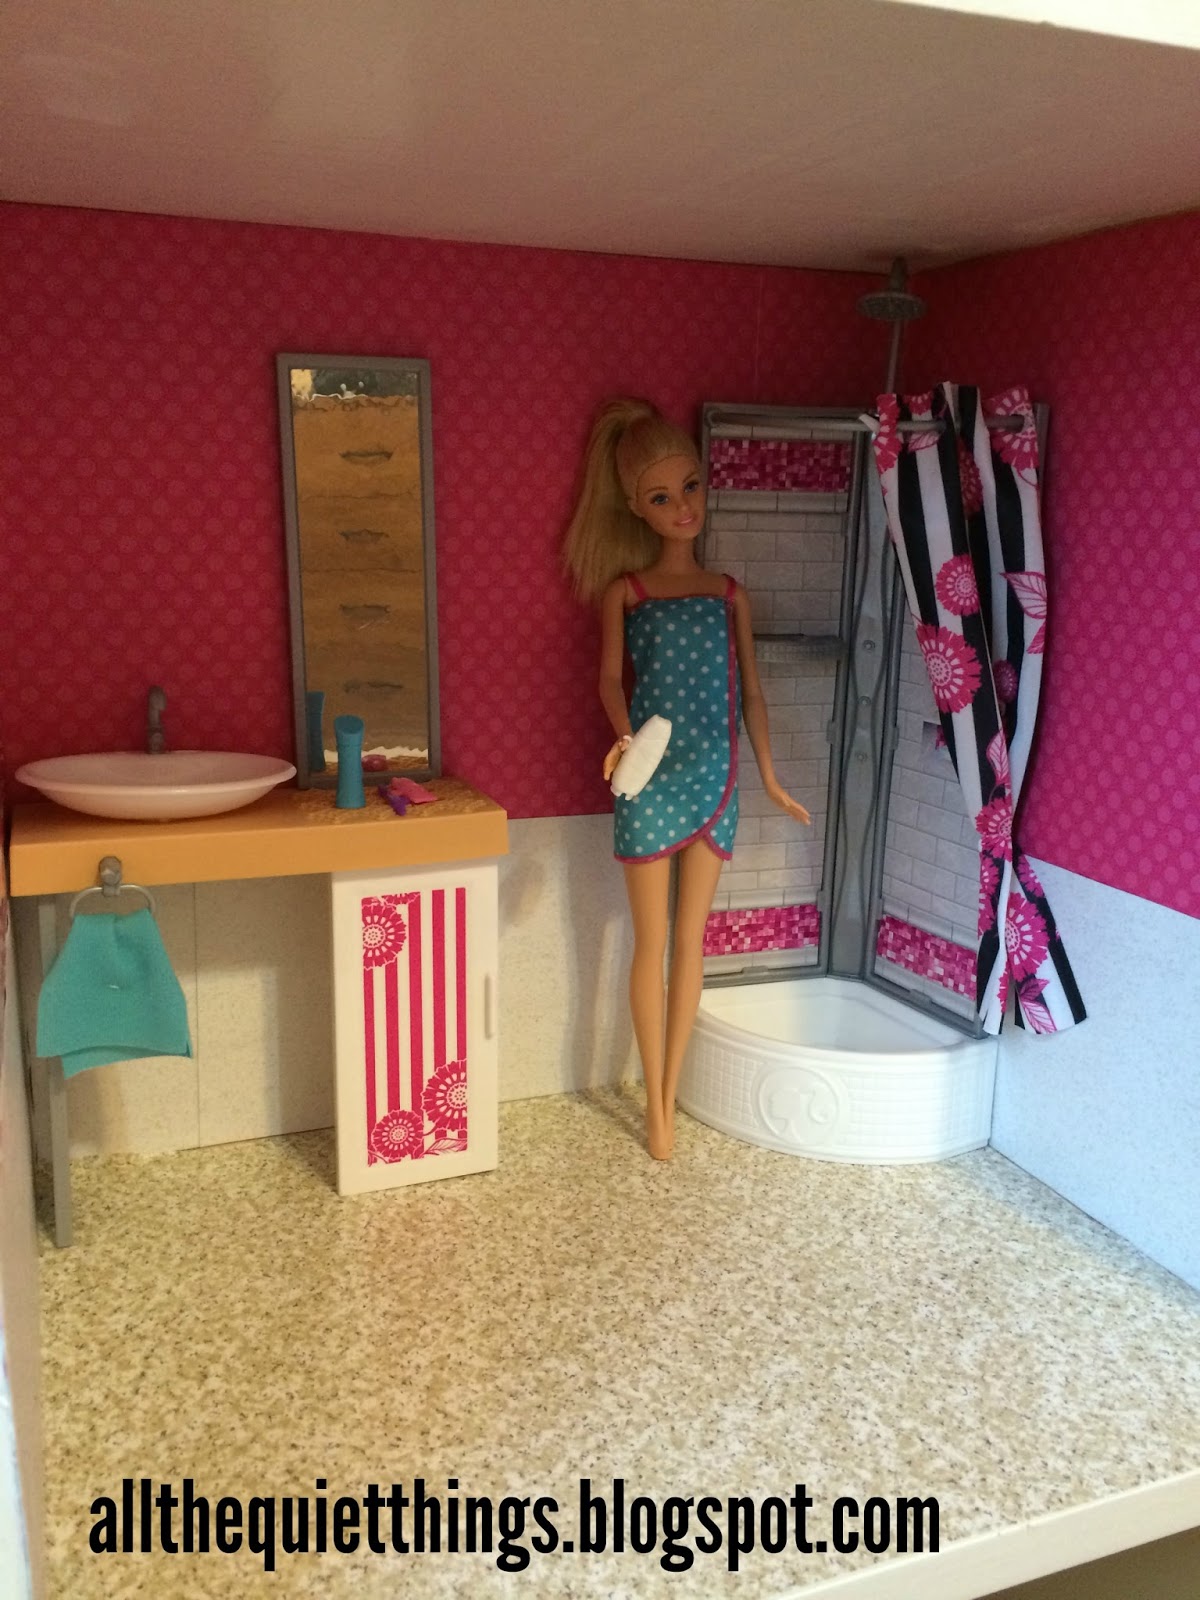
The flooring is patterned contact paper from the dollar store. I love it because it kinda looks like linoleum. The walls are scrapbook paper that only goes partway down, with sparkly white paper on the bottom third.

This Barbie also came with the set. So cute!
Living Room


I printed out a clock the size that I wanted and stuck it to the wall with Mod Podge. It would be cute to have something decorating the mantel too. Or little stockings hung at Christmas, with a little tree in the corner. Oooooh the possibilities!! Can you tell I'm liking this almost more than my daughter?

The couch and chairs were the first thing I made, so I didn't think to take 'before' pictures until, well, after. Ooops.

So here is how they break down: Basically it's just a block of wood with the thin ready-made pieces for the back and arms. Staple the base, and glue the other edges where they meet.

I painted everything black, then used the 1" foam pieces for the seats. The pillow backs are just thin batting like I used for the mattresses. I wrapped everything in material & glued it to the base and back. On the couch, I made little pink fluffy pillows and also glued them in. I used the same fluffy pink material and glued it over two small wooden cubes I had for the ottomans.


The fireplace is just more scapwood with some longer pieces on top and bottom. I painted it all black, printed out a picture of the kind of fireplace I wanted, and stuck it on with Mod Podge. I wish the picture had turned out better, it's so much cuter in person!


For the pictures on the walls, I found these adorable frames in the dollar bin at Michaels. I found some Barbie family pictures online and just printed them out and glued them to the back. I seriously LOVE them!
Kitchen

I know I have said that some of the other rooms were my favorite, but seriously, the kitchen is REALLY my favorite! I love the little breakfast nook table with the bench. I love the counter and fridge, and I love the fake wood floors! (This picture was taken before I added the window.) I could have made an oven or sink, but I wanted to keep it simple.

Here is after I added a little window. Again, with Mod Podge. I figured Barbie lives in Malibu or something, right? So she would look out her window to the beach. Jealous! I found the little cooking utensil set in the dollhouse section of the craft store. Those little things are so cute - but expensive!!


The counter is basically an L-shape made out of scrap wood. There is a wider piece on the long side that sticks out. Now if I could just find some Barbie-sized bar stools that would be awesome! I painted everything black and then just Googled "granite counter tops" looked under 'images' and chose the one I wanted. Then I printed it out, cut it and glued it on with Mod Podge, overlapping the sides. I think it looks so real!
\

I didn't even bother to finish painting the back side since it would go against the wall anyway. I'm lazy like that.

Okay, now for the table and bench...


The bases of the bench and corner couch are made from blocks of wood. The seats are made out of that ready-made wood I talked about earlier. (I don't know why I call it that, all wood is read-made. Whatever. Just roll with it.) The back is plywood scraps I think. The table is made from scrap wood and a wooden candlestick that I cut to the size I wanted.


I measured and measured with Barbie sitting to decide how high I wanted everything. The reason we added the wood pieces to the seat was because Barbie's butt didn't quite fit & I didn't want her to fall off while she was in the middle of dinner. ;)

The table also had to be just the right height for Barbie's legs to fit under. The candlestick ended up being a little crooked, but we fixed it with some glue & made sure the entire thing was level.


Does anyone recognize that Barbie standing at the counter? She is the original Twirly Curls Barbie from the 80s that I had saved forever & recently pulled out of storage for my daughter to play with. I also had a Dorothy Hamill Barbie (with broken ankles all taped up) and a Donny and Marie - that were just too beat up to pass on. I have a whole collection of various dolls still in boxes that I'm not ready to give up just yet. Maybe when she's older....
Patio and Attic Room

We found a cute patio set (with a blow up pool) that fits very nicely on the roof.

I found this little chair at the craft store also. I was just hoping Barbie would fit - and she fits perfectly!! I painted it purple & I think it looks really cute!

This is an extra room that can be used for anything but it's too high for my daughter to reach right now, so we use it for storage. That's what attics are for, right? ;)
So that's it!! I told you it was a crazy long post.

I basically made up the plans, did all the measurements, and then just told him what I magically needed done. He figured out all the hard stuff. My teenage son helped a lot too.

Look! I even have proof!
Soooo - shout out to my awesome husband and son for making all our dreams come true!! ;) I did do all of the painting, decorating, and furniture upholstering though.
Well, I hope you like this. It was a lot of work, but so fun and entirely worth it. I think all the wood ended up costing us about $80. Still cheaper than the official ones you buy at the store, and so much bigger and sturdier!!!
Thanks for stopping by! Let me know if you have any questions & I will try to answer them the best I can.
